Okay, you’ve decided that you need the shade required to keep the people in your organization or community safe and cool. After countless research and careful consideration, you found your perfect shade structure solution. You’ve even worked with a few different suppliers and come up with the best price that meets your budget. From cost to design to material, there is much to weigh during the decision making process.
With all of that work out of the way, you’re done, right? Well, not really. There’s still one critical component separating you and a lifetime of sun protection, and that’s the installation process. Installation is a beast in its own right. It’s a full blown construction project that will require planning, time, effort, and heavy machinery.
Below, we will go through the main steps involved in planning and managing your shade installation project, which looks very similar to a construction job.
Why is Shade Structure Installation Expensive?
We want to outline the following planning items you should consider before diving into your shade structure installation. These notes will help you understand why hiring a professional to install your shade may cost you more than the shade itself. You may want to save money and do it yourself, but before you throw out a construction bid that looks so high, remember these considerations.
Construction Zone
Please take note: THIS IS A CONSTRUCTION PROJECT. We find that many people think that installing a shade might be like installing a playground or tent, which may include a post-hole digger and sack of concrete. This just isn’t true. Due to the weight and wind-load of any permanent shade structure, the footers required can be extremely heavy duty and involved.
Treat the area as a construction zone, limiting access until the job is complete, inspected, and ready for use. You’ll want to fence or tape off the area while you’re working.
Tools and Equipment You’ll Need
If you do this project yourself, you’ll need to consider the equipment needs for your project, and coordinate access to your space to accommodate the equipment.
Here’s a list of the recommended hand tools and specialized pieces you’ll need for installing your shade structure:
- Side Cutting Pliers
- Builders Level
- Ratchet and Sockets
- Ratchet Strap
- Cable Grip
- Come-a-long
As mentioned, this is a construction project. To give you a flavor of the heavy equipment required, here’s a list of what is generally required for the job.
- Concrete Vibrator to make sure the footer concrete settles properly
- Skid steer or Bobcat with Auger and Bucket Attachments for digging and hauling the dirt
- Scissor Lift to hang sail fabrics on taller structures
Shade Structure Drawings
In the planning process, drawings are going to be your best friend. They’re the best way to communicate what exactly needs to take place in the installation process. Depending upon your local regulations, they may also be required.
If you are only needing drawings to communicate to your contractor what the footer should look like, you will need unsealed drawings. They are much cheaper than sealed drawings, but they communicate the exact same picture.
If your local regulations require a permit for installing a shade structure, you will likely need sealed drawings from your shade manufacturer. Sealed drawings simply mean that an engineer has placed his or her engineering stamp (or seal) on the drawings and is responsible for the calculations behind the design. Because there is a certain level of liability associated with a seal of approval, seal drawings are priced higher than the unsealed drawings.
There should be no material difference between the sealed or unsealed drawings, just the presence of an engineer’s seal. The engineer stamp is given by a licensed engineer and ensures the calculations behind the weight and dimensions of the shade structure. Even though the drawings may not change from shade to shade on the same size/dimensions, each drawing is re-checked, so sealed drawings take about 2-3 weeks to complete for standard structures and about 4 weeks for custom structures.
Lead Times
The length from the time you order your shade to the structure being installed will have some variance. Standard structures with no customization will have a total turnaround time of 4-6 weeks. For custom shades, the turnaround time will be longer and can range anywhere from 8-16 weeks depending on how much customization is required.
Shade Structure Placement
The first factor to consider when choosing your shade structure is the placement of the shade. Where will your structure be? Pool or patio? Garden or playground? Where your shade will be fixed matters when it comes to choosing footing options, entry height, pole diameter, and shade attachment options. The installation area determines the cost of the footers and remains an important consideration throughout the planning process.
Shade Structure Installation Process
As you can see, there are many elements that go into the cost and lead times for installing a shade structure. It’s why you should strongly consider hiring a professional, even if it costs as much as the shade itself. You can check out our other article about how to choose the shade and size of your shade here.
Now that we have taken you through the elements of the high expense of installing a shade structure, we will discuss the process in a little more detail. We will start with the footers, move to the poles, and finish with the hanging of the sail.
Shade Structure Footers
The footing type is exactly how the shade structure will connect to the ground. Depending upon where your structure is located, the surface or soil in that area, and the entry height needed, choosing the right footing type is important. Also, the footer type can determine the amount of labor, materials, and time it’ll take to complete the project. We will lay out the high-level process for installing each type of footer.
In-ground Mount
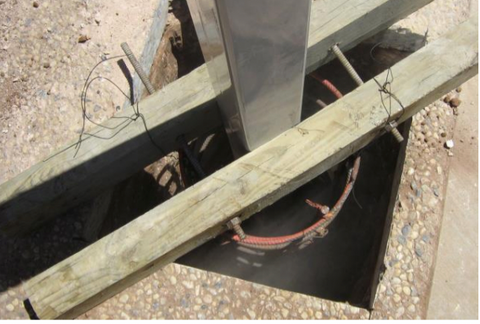
The in-ground mounted footers (or pole-in-hole in the industry) are the most common and standard type of shade structure footing. Just as the name suggests, it’s simply burying the post into the ground, albeit with a lot of digging and concrete. To install an in-ground mount you first need to dig pretty deep in the ground, depending upon the size of your shade, but it is typically 6-8 feet deep. You can opt to dig by hand, but most professional outfits will use an auger to be most efficient.
As is common in most concrete work, you’ll use a rebar cage to strengthen the footer. In addition to the rebar cage, most pros have a brace to keep the post vertical and elevated to the right level. The brace is essentially a vise grip that is custom-made to the size and dimensions you need.
To make a brace, you will need two 4x4 boards and two all-thread bolts that are long enough to pass through the boards and allow the space needed for the post. The all-thread bolts required may need to be upwards of 2’ long.
You will drill a hole through the 4x4 boards, giving space for the post between the holes, place the boards on either side of the post, and insert the bolts through the holes. Use nuts (like a wing-nut for convenience) to tighten the boards together enough to compress the pole. After this, it’s time to prepare to pour concrete.
Make sure the brace won’t move around during the concrete pour by placing a few stakes on both sides of the brace. Now, you can start pouring concrete. Make sure to use a concrete vibrator throughout the pour. This will help the concrete to pour evenly.
It will take around 24 hours for the concrete to dry. You’ll need to check in on the pole periodically throughout this time to make sure the pole is still vertical. Additionally, it is important to note that poles are made 3 feet longer than the listed entry height. This allows for ample anchoring of the poles. The taller the pole the harder it is for the pole to remain upright. Pole-in-the-hole footing is great for smaller shades or projects that don’t require the footings to be installed before the rest of the installation.


Surface Mount
Surface mount footers employ anchor plates and heavy duty bolts to connect the pole to a solid surface. Poles for surface mounts are the same length as the listed entry height and the poles are fastened directly to the ground surface. This means you really need a solid concrete surface already in place at the shade site.
Surface mounts are good for larger structures or projects that require footings to be installed earlier than the rest of the shade structure. They are also good for attaching to areas where you’ve already got thick concrete in place, like at pool areas or at outdoor basketball courts.

Recessed Base Plate
A recessed base plate footer has an installation process that resembles combining the in-ground mount and the surface mount. This means planning and pouring the concrete footers in the right spots. These footings work well with larger shade structures or projects that need the footings installed before the rest of the shade structure arrives.
You won’t need to create a brace for the pour, instead you’ll need to make a template to hold the anchor bolts. The most common template is ¾” thick piece of plywood that has holes drilled at the exact center of the anchor locations on the base plate. Now you can pour the concrete.
Remember to use a concrete vibrator to ensure a smooth pour. After the pour, remove the template. You’ll have 4 bolts ready to be threaded, use a level to make sure all 4 bolts are at the same height. You’ll now be able to begin pole installation. Poles for recessed base plates are made 1 foot longer than the entry height.
Spread Footings
As the name suggests, the spread footer is a wider footer, spreading out over a larger areas and allowing for installation in areas where you just can’t dig very deep or the soil isn’t very secure. Spread footings are the solution to shade structures that will be placed in areas that are rocky or sandy. Additionally, they are a good option if machinery access to the area is difficult, as the foundation is easier to be dug by shovel and hand.
Keep in mind that spread footings take longer to dig and are more expensive to install as labor can be your most expensive line item in the installation budget. But in some situations, this may be your only option.
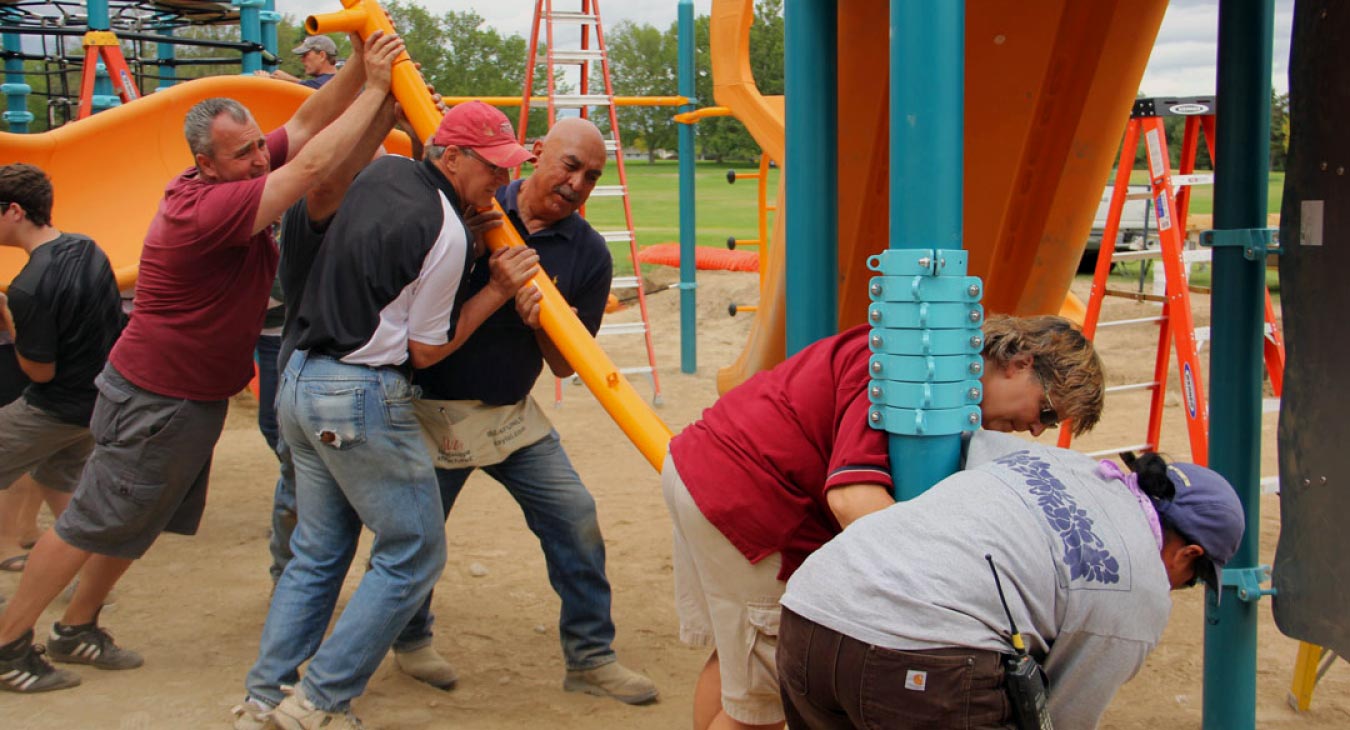
Post and Rafter Installation
You’ve installed your footings, now it’s time to bring your structure to life. Before you begin installing your posts and rafter it’s crucial you double and triple check your footings are level. A torpedo level will help immensely. You’ll also want to make sure you have a post level, it’ll come in handy when you are installing the posts.
- Make sure everythings are is level
- Make sure the heights are the same
- Connect the Posts with rafters
As previously mentioned, to install poles you will need to dig several feet into the ground. How deep in the poles need to be buried will depend on the type of footer you decided to go with. In general, poles will be placed 3-4 feet in the ground.
For single posts structures make sure the post is upright and not leaning, a pole level will be useful here. For multi post structures like hip and cantilever shades double check the posts are all the same height, you can either use a tape measure or string level.
Depending on which structure you're installing, rafter installation will differ from model to model. The universal first step for structures with embedded footings is to lift the posts and lower them onto anchors, being careful not to damage the bolt threads. In-ground mounts will already have the posts installed by this point.
From here the installation will look different depending on shade type. Depending on the height of your structure you’ll need to consider using a lift. For large structures this is highly recommended not only to increase the probability of a better outcome but also for your safety. You’ll be dealing with huge and heavy pieces of metal.
Single Post Cantilever Shades
After you’ve installed the column, you will need to lift the cantilever arm and bolt them to the post. Now you’ll lift the mast and bolt to the cantilever arm. Check that the orientation of the mast corners are in-line with where you plan them to be. Tighten the mast bolts. From here you will install the four rafters by slipping the swedged end of the rafter into the mast footing.
Single Post Pyramid Structures
will have the same install as cantilever shades except you won’t need to install a cantilever arm. You can go directly to installing the mast.
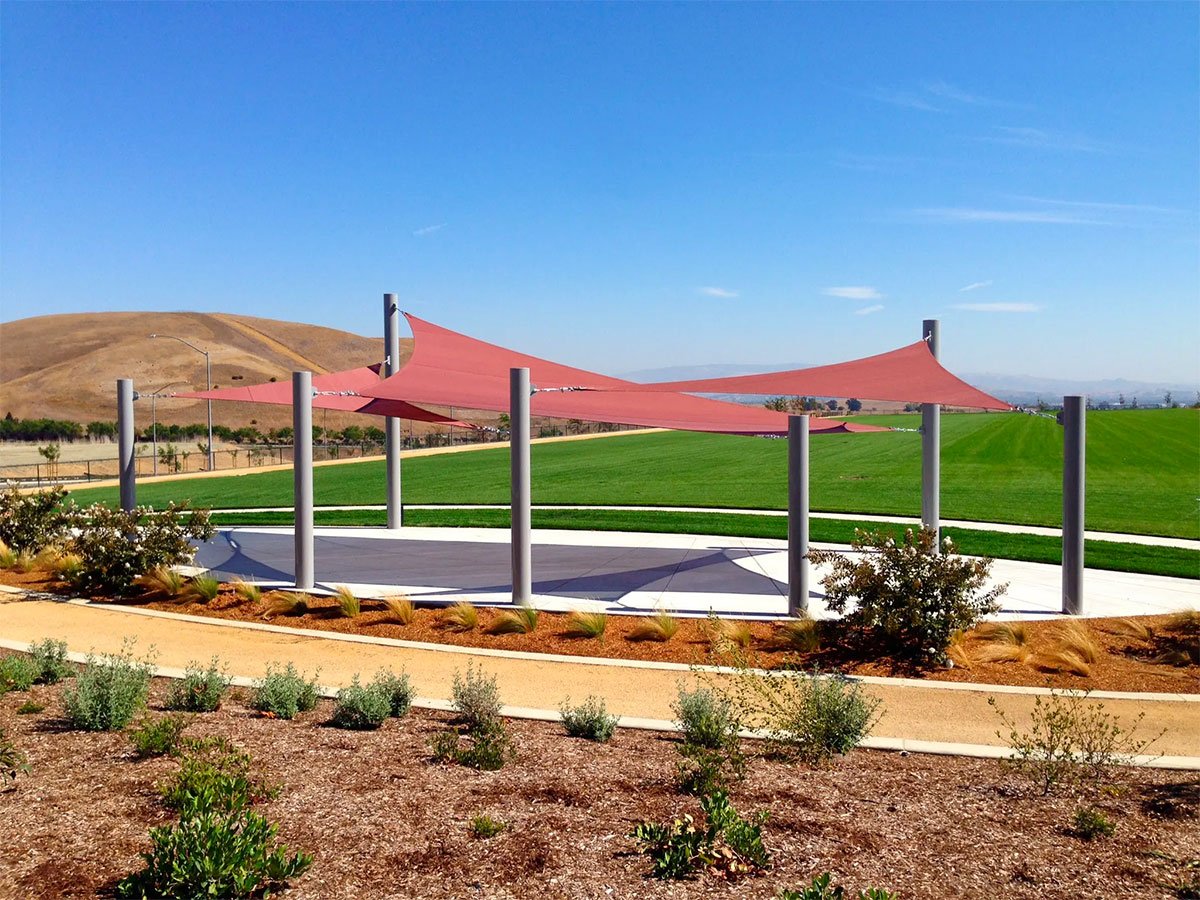
Sail Structures
have the least amount of steps when compared to the other structures. You’ll just need to install the posts. Posts for in-ground mounts will already be installed. As mentioned above, for embedded mounts you’ll need to lift the posts onto the anchors being careful not to damage the bolt threads. It is recommended to use a lift, it will make the process a lot smoother.
Pyramid Shade Structures
require a bit more work. First, layout all the parts of the roof in the general area of your structure. Then insert the rafter elbows into the rafter extensions, do this for all the rafters. Next raise the rafter extensions/elbows high enough so you can easily insert them into the column connector. Repeat for the second rafter.
Depending on the size of your structure, you may have more rafters. When you get to the final rafter use a lift to support the cross piece. When lifting the center of the cross piece be cautious to not let the rafters slip off as they will already be attached to the structure at this point. Once all the rafter elements are in place use a soft mallet to set the rafters in place on top of the posts. Next, drill holes and insert bolts, nuts, and washers into every rafter elbow.
Hip Shade Structures
will have a very similar rafter/pole installation process as pyramid structures. Begin by laying out the parts of the roof structure in the area of your structure. Insert the rafter elbows in the rafter extensions. Like the pyramid structures raise the rafter extensions/elbows high enough so they will easily insert into the column connectors. From here, insert the cross pieces into the ridge, raise it up using a lift. Insert the cross piece into the first two rafters by sliding the swedged end into the rafters.
For the final rafters use the lift to hold the already placed rafters. Lift the third rafter and slide the wedged end into the cross piece. Repeat this for the 4th rafter. Next, use a soft mallet to set the rafters in place. Finally, drill holes then insert bolts and hardware into the rafter elbows.
For large hip model structures you’ll need to use a forklift. After you’ve inserted the rafter extensions into the elbows using a forklift and lifting straps raise the ridge to eye level, insert the two cross pieces into each side of the ridge. To prepare for lifting you’ll need to duct tape the rafters to the cross pieces, this helps mitigate slippage when lifting the frame. Next tie two taglines on two of the rafters, this will help keep the pieces of the frame from swinging.
Now you can lift the entire frame, position it so the rafters are lined up with the connectors on top of the column. Lower the frame and and guide the rafters onto the connectors. Finish up by using a rubber mallet to set the rafters in place, then drill holes into the rafter elbows for the hardware.
Height of Pole
The height of the poles will be dependent on the entry height of the shade structure you choose. We offer shade structure with 8’-16’ entries. When choosing an entry height it’s important to consider where your structure will be placed. If it’s going over a large element like a playground the entry height needs to be at least 84” above the highest standing point. Not only will your shade structure be up to code, pesky teenagers won’t be able to cause damage.
Pole Installation Across Different Climates
Our poles are rated to be able withstand hurricane force wind speeds. If heavy wind speed is still a concern of yours we can increase the width of the pole to add a little bit of insurance. We have installed shade structures in Louisiana, Florida, and all over hurricane prone areas.
Hanging the Sail
For smaller shade structures you may be able to hang the sail with a ladder. Usually with larger structures, a scissor lift or forklift will be needed to properly install the shade.
Installation will slightly differ depending on the type of sail you purchase, you can take a look at different shade sails here.
Tensioning Shade
Some shades will have a perimeter cable around the edge. At each pole will be pin and cable nuts. The cable nuts will need to be fastened to secure the cable. A tool called a come-a-long will need to be used to tension the shade, making it nice and taut.
Quick Release
If you expect large amounts of snow or wind, you may consider a quick release sail. Quick release will allow you to easily remove your shade sail when you’re expecting extreme weather conditions. Our shades are rated for 90 mph wind loads, so in most cases, quick release won’t be a necessity.
Inspection and Ribbon-cutting
Woo hoo! You just finished installing your shade structure! The final step is to do a final inspection. Before you’re ready to show off your brand new shade structure to friends, family, and the public you’ll want to do a quick but thorough inspection. A lifetime of sun protection awaits!
You’ll want to check the following items at final inspection:
- Concrete is dry and level
- Pole(s) are upright and sturdy
- Pole(s) are same height
- Shade Sail is securely fastened
- Shade Sail is tensioned correctly
After pouring your heart, time and effort into this project you're finally ready to enjoy the fruits of your labor. Enjoy! Cut that ribbon!